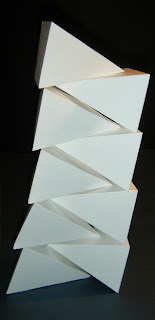
As my inspiration dried up I wanted to plant some new ideas into my head so I plodded around my garden at home looking for examples of repetition or natural forms which could be transformed into a 3D paper form.
These are what i've found...
Friday, 25 February 2011
Oh Balls!
When researching I found many different natural forms, quite a few of them however were spherical, which made me want to try and make a simple ball.
The best method I experimented with was making up a ball from many equilateral triangles with small tabs to glue the sides together...
The best method I experimented with was making up a ball from many equilateral triangles with small tabs to glue the sides together...
A shape like this could be made into a multitude of different things, to create a form which really stood out. Incorporating this into some of my sketches may develop into something special.
Friday, 18 February 2011
Working with Pyramids!
From the range of sketches and research I have done I wanted to see what could be created from individual pieces, I thought pyramids were the best place to start.
Firstly I made six triangular pyramids but couldn't make many forms with them.
These are what I created...
These forms then led me to see what could be created with rectangular pyramids, this time I made nine pyramids and with these I came up with a few more forms.
These are what I created...
With this shape of pyramid I found it much easier to make different forms. Experimenting and making different structures reminded me of playing with Lego.
I find these structures very interesting but I wonder how many more structures could me made and how they would look with even more pyramids.
Thursday, 17 February 2011
Workshop 3
In this Workshop I learnt a few more techniques to create 3D shape and form from a flat piece of paper. These methods will definitely bring me some inspiration when thinking of new designs and shapes... which will hopefully show in my sketches.
These are what I created...
These are what I created...
I really like the zigzag effect of the first image which can easily be transformed into a different design, also the effect of the last image will transpire well into a 3D form inspired by the fish skeleton repeat patterns I found.
Wednesday, 16 February 2011
Workshop 1
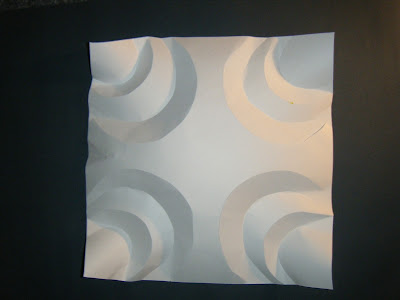
The main point of this workshop was to try and make a 3D paper form without the help of glue, sticky tape or anything else to help fix it together. I chose to explore and experiment with just scoring the paper to create a fold line to create shape.
These are what I created...
These are what I created...
After the session I wanted to practice the method on a bigger scale so I moved up from A5 paper to a square piece, cut from A3 paper. This now allows me to easily make a more intricate pattern.
Monday, 14 February 2011
REPEAT PATTERNs... that i've found!
I decided that while spending the weekend in Leeds I should be productive by looking for repeat patterns around the city... equipped with my useless trusty BlackBerry camera this is what I found...
Although these aren't examples of natural repeat patterns, they still show a repeat which will influence and inspire some new creations.
Tuesday, 8 February 2011
REPEAT PATTERN!!!
Repeat pattern... This is a huge part of the project so I thought it is necessary for me to do a quick bit of research on the internet to get a few ideas planted in my head, these are what I have found...
I really like the structure of the fish skeletons, there are methods that I have learnt in the workshops which will transpire well into a fish skeleton 3D paper form.
I really like the structure of the fish skeletons, there are methods that I have learnt in the workshops which will transpire well into a fish skeleton 3D paper form.
The next thing I found inspiration from is the symetry and repetition from the plant cells... these as a 3D paper form would have more of an impact and will be successful in a range of the methods I have learnt in the workshops.
Monday, 7 February 2011
Yulia Brodskaya
The creations that Yulia makes are so playful and colourful, her typography's interesting and will be a real inspiration. I like the detail and perfection of her work and I love how the method she uses of curling strips of paper creates such interesting shapes and shadows.
Looking at her work really inspired me to create something quick using the same method. This is what i did...
Looking at her work really inspired me to create something quick using the same method. This is what i did...
I think it in keeps with the playful nature of her creation... and what's
more fun than Pikachu???
Workshop 2
Before we started Workshop 2 there were some instructions given before we could start creating our individual 3D form,
The shapes and shadows created by the form look organic. It was created by playing with the sheet... pulling and twisting to see what shapes were being made.
- Firstly, we needed to fold our piece of A2 paper in half (length ways)
- Next, we had to make a border 15mm from the edge of the page
- Then, we needed to cut strips all the way down the page 10mm appart
- Finally, when all this had been prepared we can begin creating our forms.
This is the first form I had created... I used glue to fix the ends and some staples as a quick method of keeping the form together. The shape is reminiscent of a sea side shell.
--------------------------------------------------------------------------------------------
My second form was created by folding the sheet into a fan and bending it to get a wavy shape... then I found when twisting it I got this form, which is again similar to a sea side shell.
I fixed this form with staples again... they are quick to use and easy to remove, should I need to change the form.
This interior image gives a interesting perspective that looks similar to a spiral, or the twist of a snail shell.
Subscribe to:
Comments (Atom)


