
Monday, 14 March 2011
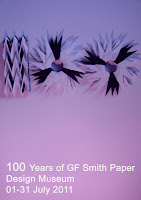
My '100 Years of GF Smith Paper' Poster.
POSTER!
I wasn't too sure what I wanted my poster too look like so I spent some times playing around on photoshop and coming up with a few different ideas...


Wednesday, 9 March 2011
Methods of Photography...
The main aspect of the poster is the photo... so the photography of my paper form is extremely important, which is why I tried to use as many different methods as I could.
These are some of my favorites.


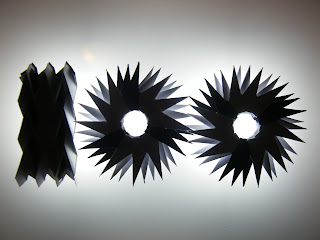
These are some of my favorites.


Friday, 4 March 2011
Making my '100 Years' form...
I thought that the best way to go with this poster would be the obvious way, making a paper form that simply said '100', but I didnt want it to look too simple. I looked back at some of my sketches and paper methods from the previous task to see what could transpire well into this '100 year' form.
Origami is where I ended up and for the 0's of my '100' I folded 72 separate triangles that slotted together to make 6 indiviual rings which I then stuck together to create two 0's.
For the number 1 in my '100' I reused a method I had utalised in task 1 and then developed it in my sketchbook to get the best form that would tie in well with the '0' forms.


I needed to try the form for the number 1 a few times because the paper I first used wasn't white enough and the second time the paper was too thick, but when I got a piece that matched, I cut some windows in the form so that you could see the layer behind which helped tie it in with the '0' forms.

Sheaf Atrium 3D Paper Sculpture

The starting point for this design was when researching natural forms and I came across fruit, this then led me to cherries, I didn't want my sculpture to be too literal which is why I used geometric shapes and didn't do the 'leaves' in the traditional green colour.
I had difficulty when hanging the forms because I didn't have any idea how to do it, but with a few experiments I found a simple method of sewing the paper and tying the different forms together worked well.

Making my 3D paper sculpture...
To start, I had to create the three sphere shapes that are inspired by cherries.


- Firstly I used a stencil to draw sixty equilateral triangles on two different shades of red paper leaving space to create the tabs which will stick the individual pieces together.
- Once the shapes had been cut out and the edges trimmed I needed to score the tabs so that they would bend easily.
- Next I simply glued the tabs together to create three balls.


For the next part of my 3D sculpture I had to create the component that was inspired by geometric leaves.
- Using methods that I had learnt in the workshop I folded paper different sized paper sheets into these leaf forms.
- I folded the paper irregularly to create a natural variation and used black and white paper to make more of a contrast between the light and dark.


Wednesday, 2 March 2011
Fruity!
A natural form that has brought me a lot of inspiration for many of the designs in my sketchbook is fruit. Fruits have bright colours which would make a 3D paper sculpture derived from fruit very stunning. The other thing I enjoy about fruits like oranges or limes is that inside they have a repeat pattern and a segmentation/symmetry which would look amazing when recreated as a 3D paper form.


Other fruits that would look really interesting when recreated as a 3D paper form could be: Cherries, Dragon Fruit or a Pomegranate. I will have to see what ideas I can create in my sketchbook.
Subscribe to:
Posts (Atom)